Tag Archives: hp support number

How to Fix HP Printer Cartridge Problem?

HP a milestone in the market of technology. Yet a common problem faced by its customer is the HP printer Cartridge problem. The message is flashed on the control panel and restricts the printer to print the desired output. The customer can improvise this error by following simple steps, but the customer fails to do so. They must contact the HP support center for any assistance. Their highly qualified tech team is always available for help from their customers.

A message like “Print cartridge does not detect or missing “will hinder work and spoil your mood then. This blog reads the most helpful solution to this problem.

Dial toll Free Number : +1-855-362-0770

Significance of Failure of HP Printer Cartridge

This problem arises when the user is printing documents, or the ink tank is empty. There might be another reason that the printer is not able to recognize the cartridge. The failure in the printer’s cartridge will result in a stoppage of printing the documents.

Ultimate troubleshooting steps to eliminate cartridge error

The user might forget to remove the detachable Yellow sticker on the printers cartridge
  • The printer won’t acknowledge the ink cartridge until the user has not removed the yellow tape from the ink cartridge’s top. It is necessary to strip off the protective strip to start printing new documents while installing a new ink cartridge.
Outdated printer drivers can also cause this type of error 
  • Setting which suggests the auto-update is necessary and fixes any errors, but sometimes it also creates some ink cartridge problems. Users must update the printer driver and can remove this error easily.
Clogged nozzle and dirty metal contact
  • Dust and greasy metal contact or particles are a high risk to HP ink cartridge. User must ensure that the HP printer cartridge Problem must not have any broken or damaged piece while fixing the printer and cartridge. This will result in unreadable commands for the printer cartridge.
Ruined chips can also be the root of this error
  • After refilling the ink cartridge, the error continued in the ink cartridge. Surely the reason will be the leak of ink and when the computer starts reading the chips. They are damaged and unable to respond. Users will need special tools to fix this problem.
Installation of the inappropriate ink cartridge
  • Users sometimes install incompatible ink cartridges that result in an error with the flash of a message that the ink cartridge is incompatible with reading. Hence must take the help manual and adequately identify the type of cartridge fit in the printer.
  • Users sometimes install color cartridges in black and white cartridge tanks and vice versa. They must ensure the right fixation of cartridges in the tank.

Conclusion

WE hope you find this blog helpful, and it suggests cool steps to rectify the ink cartridge error. Users are free to contact HP customer care number and obtain the best possible assistance from their active and enthusiastic tech team. Their technicians are dedicated to helping their customers to the best.

How do I Fix HP Printer Validation Failed?

HP Validation Error is a common error faced by a lot while using any of the HP printers. Common ways to resolve is by running basic Troubleshooting on the computer or reinstalling the whole printer in the system. However, sometimes users are still not able to fix the validation for which they need some immediate assistance. Thus here we have provided regarding the validation error, including common causes and how to fix them. Hewlett Packard (HP) Printer are among the best printers available for common purposes and working professionals. However, any issue while using a printer can be a big trouble and can hinder the whole working process of anyone. Thus it is crucial to have a piece of basic knowledge of printer troubleshooting yourself. Read the article further to know how to fix HP Printer Validation Failed Issues.

How to Setup HP Printer on iPhone?

Common Reason for HP Printer Validation

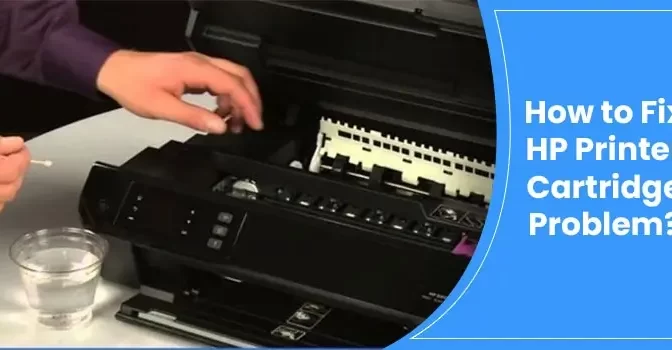
The most basic reason for HP Printer Validation is the issue with cartridges; possibly due to some reason, the movement of the cartridges in the printer is restricted or hindered due to any external issue or technical glitches in the printer software.

Common measures to deal with HP Printer Validation Failed Error

The most common way to deal with HP printer validation issues, as mentioned above, is basic Troubleshooting. However, in case still, HP printer validation failed error, you can reset the printer settings or uninstall the printer software from the system. Some of the common measures are elaborated on below:

Use basic Troubleshooting to fix HP Printer Validation Issues

This is the foremost and the most common measure to be applied when HP Printer validation is failed. Follow the given for troubleshooting the HP printer validation error:

  • Open the search menu and then type “Settings”. There in the “System” section, select “Troubleshoot”.
  • Now in the troubleshoot menu, select other troubleshoot and select “Printer.”
  • From there, a list of printers will appear, showing various printers which is connected currently or earlier in the system.
  • Select the printer which you want to troubleshoot. Click Next to start troubleshooting.

Reset the Printer Totally

Simply, you just need to power off and pull out all the cables connecting the printer to other devices and power sources. Wait for a few minutes, and then restart the HP printer and check for the HP validation error.

Uninstall and Reinstall the HP Printer on your Computer

In case you are unable to fix the HP Printer Validation issues, you need to uninstall the HP printer software, device, and other related data. After that, you need to start the installation process from scratch. Follow the installation process elaborated below step-by-step:

Uninstall the HP printer software from your system

In order to uninstall the system you need to open the run window (press “window+R), after which you need to follow the given steps:

  • Now enter “appwiz.cpl” in the run prompt, which will open the “program and features” menu in the control panel.
  • There you need to find all the programs and software related to HP printers.
  • Right-click on them and then select “uninstall.”

Remove the Printer Device from your computer.

First, you need to unplug the printer from the computer or disconnect it from the network to which it is connected wirelessly. Then follow the given steps:

  • Type “control printers” in the Run window and press enter to list all the printers connected to your computer.
  • The “Device and Printer” menu will open, which will display all the printers and devices which are earlier connected or are currently connected to your system.
  • Select the printer you need to remove from the computer. Right-click on it and then select “Remove Device” to remove the printer from which you facing trouble.
  • Click on Yes to confirm the removal.

Uninstall Printer’s Driver from the Computer

  • Uninstall printer-related driver from the Printer Server Properties
  • Open the run menu on your computer, and there, type “printui.exe /s” and then print enter. This will open the printer server properties windows.
  • In the printer server window, select the driver’s tab, which will open the list of all the drivers of the printers connected to the computer.
  • Select your drivers of the printer and then click on the “Remove” option. Click on Apply and then OK to make changes.

Remove the printer-related driver from Device Manager

In the run menu, type “devmgmt.msc”, and after that, click OK. This will open the device manager.

  • There, navigate to the “print queues” menu. Expand it and select the printer whose driver you have to uninstall.
  • Right-click and then select “Uninstall Device” and confirm the uninstallation process.

Remove all printer-related files from your system.

First, you need to make changes in the folder view option to view all the hidden files, and after that, delete all the printer-related files. For that steps are listed below:

  • Open any folder on the desktop. Then on the top, select the “View” option and then click on “Options.”
  • In the view tab, there will be an option “Show Hidden files and folder.”
  • Click Apply and then OK.
  • Now open the “C” drive and then there select “Program Data”. There you can find the folder named as “Hewlett-Packard”.
  • Delete that folder.

Reinstall the Printer Software on your Computer

  • For that, you need to go to the official HP Printer Download Center.
  • On the search menu, type the printer name and then click on “Submit”.
  • Navigate to the “Software-Utility” section and then find the latest driver related to your printer and download it. 

Install the Printer Driver on your computer.

  • Now that you have downloaded the driver from the HP website follow the given steps to perform the installation process:
  • Go to the download, and from there, select the Printer installation file.
  • Double-click on it in order to install the latest driver.
  • Agree to the “Terms and conditions”. Make sure that you have connected the printer and device through the USB club.
  • After the installation has finished, then restart your device.

Use HP Print and Scan Doctor

You can download the HP Print and Scan Doctor, through which you can resolve any of the issues with your HP Printer. To download and use “HP Print and Scan Doctor”, for HP printer validation error, follow the given steps:

  • Go to the official website of HP support, and from there, download the HP Print and Scan Doctor.
  • Once the download is complete, go to the download location and select the “HPPSdr” file in your system. Double-click on it to start the installation process.
  • Click on the “Run” option and accept all the terms and conditions by clicking “Accept”.
  • Once the installation has been completed, click on the Start option and search for the active printer connected to the computer.
  • Select the printer which you need to troubleshoot and click “Next.”
  • Now the scanning will start, and any error or issue with the printer is resolvable by the HP Print and Scan Doctor Application.

Use HP Smart App to resolve HP Printer Validation Issues.

You can resolve the validation error of the printer with the HP smart App. to use the HP Smart App, follow the given steps:

  • Download the HP smart app from the official website of Hewlett Packard. Once the download is complete, install it from the download folder.
  • Now, open the app, and on the top-left corner, select the option to open the menu.
  • Select the “Diagnose and Fix” option to resolve the HP printer issue and then click on Start.
  • Select your printer device and click “Next” to start the scanning process.
  • Once the Troubleshooting is complete, try to run the printer again.

Reach out to us to Fix any HP Printer Issues.

From the above discussion, we hope that now you can easily fix the validation error while using an HP printer. In case you have any trouble or need further assistance, you can contact the number given below, where our customer support expert will provide assistance instantly. You can also use the live chat, to which we will revert with the possible in the given time.

How to Fix HP Deskjet Printer Scanning Issues?

Are you trying to Fix HP Deskjet Printer Scanning Issues? Well, plenty of reasons can be there, like connection problems or any other software for which you can find the solutions here. Hewlett Packard (HP) is among the top enterprise providing all the hardware related to information technology. Among them, one of the best products is the HP printer which provides the option of both printing and scanning. Although printing through an HP printer is an easy and swift process, people sometimes face problems while scanning any documents for which they might need assistance. But some of the common issues can be troubleshot by the users themselves. Here we have provided all the information regarding the common issues along with their solutions which, after reading, users can resolve scanning problems by themselves. Read the article further to know more about how to fix HP scanning issues.

How to Fix HP Printer not Printing Black?

Causes of Scanner Issues in HP Deskjet Printer

There can be a variety of reasons why HP Deskjet Printer Scanning Issues. Some of them are as follows:

  • The printer won’t be able to connect to the computer. 
  • Update Both printer and Scanners drivers
  • Any hardware like a loose cable or another issue with the printer.
  • HP scanning application is already running in the background while you are still trying to run it. 
  • There might be any other technical issue with the printer.

HP Deskjet Will Pop Up follow messages if having Scanning Issues:

  • Unable to reach Scanner 
  • Unsuccessful Scan
  • Could not initiate scanner
  • HP Scanner not working
  • Could not detect computer.
  • Cannot connect to the computer.
  • Error found while connecting with HP imaging device.
  • An error occurred while connecting with the scanning device. 
  • HP scanner not working because you have updated windows and upgraded it.

How to fix the HP Printer Scanning issue

Plenty of measures can be taken by the users themselves in order to fix HP Deskjet Printer scanning Issues:

Fix your connection to fix HP scanning issue

You need to make sure that all your connections with the printer are working fine, which are listed below:

  • First, you need to check the power connection, i.e. whether your printer is powered on or not. 
  • After that, check out for any loose cable connections in USB cables or ports. 
  • You have to connect your scanner and computer with a good internet connection.
  • VPN can create hindrances while connecting the scanner and printer. Thus make sure your VPN is disconnected. 
Fix Windows Image Acquisition to fix HP Deskjet Printer Scanning issue

In windows, any graphic software is able to connect to the scanner through a Window Image Acquisition model. There might be a possibility that WIA is disabled. Thus you need to make sure that the Window Image Acquisition model is enabled. For that, follow the given steps:

  • You need to open the run prompt window by pressing “Windows+r.”
  • After that, type “services.msc”, and after that, press “OK.”
  • A new window will appear on the screen titled “Services”. There, search for Window Image Acquisition. Click on it to open properties.
  • Under the General tab, check for Startup Type (Automatic) and Service Status (Running). Apply changes and click OK.
  • After that, make sure to check the same thing for the following services:
    Shell Hardware Detection
    RPC Endpoint Manager
    Remote Procedure Call RPC
    DCOM server process launcher.
  • Make sure that these services are Automatic Startup Type and the Service Status is on “Running.”
Update the Scanner Driver from the official Website

You need to reinstall/update the software and driver of your scanner and printer. For that, you need to follow the given steps:

HP scanner not working should be uninstalled from the system:
  • Open the control panel on your computer. Go to the option “Program” and then select “Uninstall a Program.”
  • From the list of software, select the HP Printer software and click on Uninstall. 
  • Now remove your Printer option from the computer. For that, open “Printer & Scanner.” 
  • Select the printer from the list and remove/delete it. 
Reinstall the Software/Driver from the official HP website
  • Visit the official HP Printer support page. There you need to provide your printer model number or product name. 
  • Now the list of software and driver will be available for you. Based on the operating system you are using and your system specification, choose the suitable driver.
  • Double-click on it, which will start the installation. 
Use HP Print and Scan doctor to fix HP scanning issue

You can download the official HP troubleshooter to fix any printer and scanner issue you are running in your system. Follow the given step to download and run HP Print and Scan doctor: 

  • Open the official website of HP Print and Scan Doctor for Windows.
  • There, you can find the direct download HP Print and Scan doctor.
  • Click on the link.
  • A pop-up window will appear on the screen, asking to fix the printer’s offline error. If you click yes, it will download the version suitable to resolve offline printer errors. Click NO to download the latest version.
  • Once the download is complete, now click on the file to start the installation.
  • Agree to other terms and conditions. After that, click on Start to detect your existing printer connected to the system. 
  • The application will display the list of printers connected to your system currently or earlier. Select the one from which you are facing the issue. In case you are unable to find your device select “My Product is not Listed.”
  • Once you have found your product, click on Next.
  • Now the system will ask to fix printing or fix scanning.
  • The program will display the list of the detected problems. You need to follow the given instruction to fix them.
  • Once your problems are fixed, click on Quit. If you are having any other issues click on Start Over. 
Troubleshoot Printing and Fix HP Scanning Issues after Windows Update or Upgrade

Whenever you make any update in your system or Upgrade the whole Windows, there might be a chance that your Scanner is incompatible with the updated version. Majorly there will be a connectivity issue where the message “Printer is Offline” is displayed. In that case, you can take the following measures.

Upgrade the Window and then restart the System

Once you have updated your system, there might be a possibility that all the programs are not in sync with the operating system. 

Check HP Printer compatibility with Windows. 
  • Open the official HP Support Page.
  • There on the top of the page, click on the option “Diagnostic” and select “Windows Support.”
  • Scroll down the page and select the option “Printing” based on your operating system.
  • On the new page, click on the option “View Compatible Printers”, which will open the list of compatible printers. 
  • Select the printer category and search for your model and product number in that list.
  • In case your device is on the list, then you need to update the latest driver and software for your printer.
  • You can also download the HP Printer and Scan doctor or choose system restore/recovery from the official website of Microsoft. 
Fix corrupted files using System File Checker.
  • Open the Command Prompt. For that, type “command prompt” or cmd in the search box. 
  • Type sfc/scannow and press enter. 
  • Let the Scanning Complete. The system will look out for corrupted files and fix them.
  • Once the scan is completed, restart your system and try to run the scanner again. 

On an Ending Note 

We hope from the above-given measures, you can now easily troubleshoot common issues you face while scanning with an HP printer. Apart from the above-given solutions, you can also try to disable the firewall/antivirus or restore the printer setting to default, which can help you to fix HP Deskjet Printer scanning issues. In case you are still having any trouble with scanning while using an HP Printer, you can reach to our customer support services. Our technical experts will be available 24/7 to help with any issue you are facing, not only with HP Printer but with any other printing device you have. Just call on the given number or use the live chat, where you can provide your contact details along with the query. Our team will contact you in a minimum time with the required solution.